
Hello There.
I did create a lab in which I was able to convert a minione server into a 3 node server, with the initial minione server acting as a controller. Eventually I will write how to do that.
This Blog instead is about the travails of configuring Open Nebula and the limitations of Sunstone the GUI. In particular trying to use VXLans and Virtual Routers.
Background
As mentioned, I installed a 3 node OpenNebula cluster using minione. Not the standard way according to sources. However, I could not for the life of me install a 3 multi-node cluster using the instructions.
So I figured the next best thing, installed minione, had it working, added NFS and then added two more nodes. Probably merits another post but the reason for this post is the issues I got trying to add a VXLan network and VMs plus the use of a virtual router to connect to the Internet.
The part in which standard VMs communicated with external networks was easy enough not so much for the VXLan vms and the virtual router.
Setup
The following figure shows my current network setup.
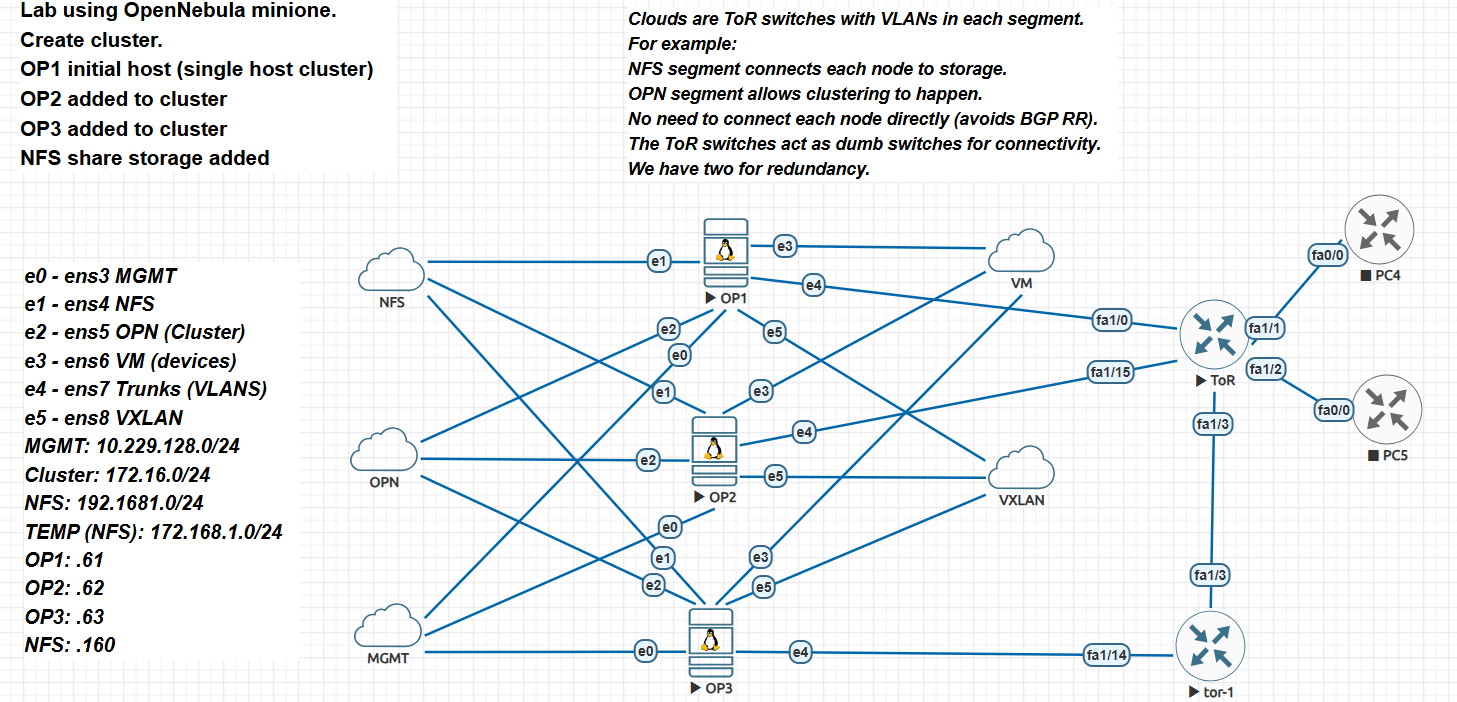
A bit busy as you can see but not really.
- OPN is the cluster network
- NFS allows external storage (on an ESXi server)
- VM where normal vms, so do speak, reside. The corresponding bridge is configured.
- The ToR switches allow for VMs to be created, in this case two vlans that connect to PC4 and PC5
- The VLAN interfaces are created on all the nodes. Communications to vms in particular for password-less ssh is done at the controller (OP1)
- This of course is a point of failure, a better scenario, is to have at least two more controllers with a VIP. In this case, if the controller fails you can still access the cluster.
Network Configuration
As mentioned, the underlying bridges that allow vms to access services were configured.
In our setup the VM cloud allows us to create vms. In order for those vms to talk and be accessible from the controller the following needs to be done on each node.
network:
  version: 2
  renderer: networkd
  ethernets:
    minionebr-nic: {}
  bridges:
    minionebr:
      addresses: [ 172.16.100.1/24 ]
      interfaces: [ minionebr-nic, ens6 ]
In our case, we are using Ubuntu 22.04.5 and using netplan. Interface ens6 if the physical interface that each node will use for communications. The IP address will be different for OP2 and OP3 however you do not need to have an IP as long the controller node do have one. The IP here also acts the default gateway for the VM network. In our case I named this file minione.yaml.
To access the ToR network we need to create a few vlans. In our case we have two vlans and the netplan configuration, named vlan-bridge.yaml, not very imaginative does it not.
network:
  version: 2
  renderer: networkd
  ethernets:
    ens7:
      dhcp4: false
#    ens8:
#      dhcp4: false

  bridges:
    vlan-br:
      interfaces: [ ens7 ]

  vlans:
    vlan100:
      id: 100
      link: vlan-br
      macaddress: "00:11:11:11:11:11"
      addresses: [ 192.168.100.254/24 ]
    vlan110:
      id: 110
      link: vlan-br
      macaddress: "00:33:33:33:33:33"
      addresses: [ 192.168.110.254/24 ]
Once again ens7 is the physical interface that allows vms created in this virtual network to access resources.
And of course the standard netplan yaml configuration.
network:
  ethernets:
    ens3:
      dhcp4: false
      addresses: [ 10.229.128.61/24 ]
      routes:
         - to: default
           via: 10.229.128.10
      nameservers:
         addresses: [10.229.128.10]
    ens4:
      dhcp4: false
#      addresses: [ 192.168.1.61/24 ]
      addresses: [ 172.168.1.61/24 ]
    ens5:
      dhcp4: false
      addresses: [ 172.16.1.61/24 ]
    ens6:
      dhcp4: false
    ens8:
      dhcp4: false
      addresses: [ 172.16.2.61/24 ]
  version: 2
Here ens3 is management (allows us to ssh into the cluster to configure it), it goes without saying each node needs a different IP.
Interface ens4 is our access to the external NFS storage.
Finally interface ens8 is used for VXLan networks. You need to pay attention since according to the docs it needs an IP. This because VXLan uses tunnels to extend traditional LANs and you need an IP so those tunnels can be created. Do not forget to install the OVS package (or whatever is called on your distro) otherwise you will not be able to create VXLans networks.
Adding a VXLAN and a Virtual Router
The purpose of this exercise was to create a VXLan, a VM then allow this VM to access the internet and if we wanted talk to other vms in our environment.
To add a Virtual Router you can use the native one that OpenNebula uses however, I found out that is just an Alpine Linux machine. So I decided to created my own, it works fine. All issues I encountered are basically the same and can be fixed in the same way.
VXLan virtual Network
The VXLan virtual network is similar to the others created with the difference that you use Open vSwitch-VXLAN, this creates the network using the virtual switching capabilities. In principle you would not need to talk to external networks if you do not want to.
At one point some of your machines will need access to resources outside your SDN, here is where you would map the VNI to your corresponding VLAN.
Configure the IP addressing, the default gateway (this will be the IP of one of the interfaces in the virtual router), and finally set the MTU to 1450 (the standard value). The reason for this is that VXLAN uses encapsulation thus the overhead which taken care by the MTU value. Remember this it will come to bite me hard.
After creating it now you can fire a vm as normal.
Good enough right. Well since there is no physical interface configured with a bridge and more important an IP address. How in hell are you going to ssh password-less to it?
They do not mention that in the docs do they!
We will jump to it from the virtual router. You can add via contextualization a password for root. I decided to punish myself and implemented a script to run when the machine boots.
It is added in the context when you update a vm. Here I added a user, added it to the wheel group, modified sudoers, rebooted and voila, I was able to log on the console with that user and since it is part of the wheel group have root privileges.
Virtual Router
Now it is time to add the virtual router. Created a vm running Alpine Linux. Run into an issue, it will not let me add static IP addresses on the interfaces. No matter what I tried.
So, created it any way letting OpenNebula assigned IPs and gateway, remember to add DNS (in my case the IP for the bridge on OP1).
Here unlike the VXLAN vm I could ssh into the virtual router since OP1 has an IP on that network.
Did the same trick, added a script to create a new user, in addition create the interfaces file named it interfaces.static, added the new static IP addresses and gateway remembering to restart the networking process and let it rip.
The virtual router did reboot and it had the correct static IPs and the new user.
The script I used is ver basic, you can add other commands as I did for the networking stuff.
#!/bin/sh
set -e

# Define variables
NEW_USER="myuser"
NEW_PASSWORD="mypassword"
#SSH_KEY="ssh-rsa AAAAB3Nza... your-public-key-here"

# 1. Create the user and set a password (using encrypted hash for security)
useradd -m -s /bin/bash "$NEW_USER"
echo "$NEW_USER:$NEW_PASSWORD" | chpasswd

# 2. Add the user to the wheel group (RedHat/CentOS) and sudo group (Ubuntu/Debian)
usermod -aG wheel,sudo "$NEW_USER"

# 3. Add to /etc/sudoers (Distributions without a %wheel group config)
echo "$NEW_USER ALL=(ALL:ALL) ALL" >> /etc/sudoers

# 4. Optional: Set up SSH keys for passwordless login
#mkdir -p /home/"$NEW_USER"/.ssh
#chmod 700 /home/"$NEW_USER"/.ssh
#echo "$SSH_KEY" > /home/"$NEW_USER"/.ssh/authorized_keys
#chmod 600 /home/"$NEW_USER"/.ssh/authorized_keys
#chown -R "$NEW_USER":"$NEW_USER" /home/"$NEW_USER"/.ssh

# Use your own values
echo change IP
cp /etc/network/interfaces.static /etc/network/interfaces
echo "Restarting networking service..."
rc-service networking restart

echo "IP address successfully updated to x.x.x.x.254"
Here you need interfaces.static already available, so you need access via console to make it. Of course the astute reader will see that you can do all of this in the script itself using variables. I will let that for the bash inclined to figured out.
After this the virtual router (VR) was up and running.
We now need to install some packages like IPTABLES etc. Since the VR connects to the internet via 172.16.100.1 on OP1, it is simple enough to add on OP1 a masquerading rule.
iptables -t nat -A POSTROUTING -s 172.16.100.0/24 ! -d 172.16.100.0/24 -j MASQUERADE
After this VR can access the internet and I was able to install everything I needed.
After a reboot, connect to VR, make sure IPTABLES is running and the rules will remain after a reboot. After that add the following using the IPTABLES command.
iptables -t nat-A POSTROUTING -s 176.16.20.0/24 -o eth0 -j MASQUERADE
Use the network you created for your VXLan. Remember what interface is the out one. In our case it is ETH0 and ETH1 is the one towards the VXLAN network.
Now it should work, if we go to the VXLan vm we should be able to access the Internet.
It did not! Remember when I said the MTU value would come to bite me. Well when the vm is created it should be created via a template that has MTU 1450 in it. I spent two days chasing this until it hit me. For our case I added to my trusty script a command to set the MTU of the vm to 1450. Voila it worked.
Of course all of the stuff done should be done creating templates that can easily be modified to make new vms.
Now if you have several VXLans networks you may need to prevent tenants from accessing each other.
This can be done in two ways, create security groups that allows all VXLan nets to access the VM net in our case, access to the Internet, and then block traffic between them.
Or you can add the corresponding IPTABLES rules on the VR.
However, security groups are more general in scope. If you do not have a VR and you only use the default security group, access will be allowed by default.
I think this particular issue is misunderstood. By default any VLAN (VXLan or otherwise) should not be able to talk to another VLAN. That is the definition of a VLAN.
Unless there is a L3 device that allows communication (the VR in our case). On the other hand in OpenNebula by default every virtual network gets the default security group, which allows all. Thus, you need to delete the default security group and configure your own.
This is one of the strength of SDN networks, you do not need firewalls to control access however, it is also a weakness because by default access is allowed unless denied. At least in OpenNebula.
In any case, a security group(s) will prevent cross trafic between networks and only allow those you want.
Well there you have it.
Until another day.
Ciao.