
In this blog I will show how to install an OpenNebula cluster from scratch, well almost, using an ISO that allows you to create a minimal configuration. The initial setup can be extended to have an almost functional production setup.
Motivation
In the past I have used the so called all-in-one setups for both OpenNebula and OpenStack.
While they do work fine, you need to setup a production like system. It actually teaches you the ins and outs of the setup. I will eventually have a blog on how to do this for OpenStack.
But first OpenNebula, I was in the process of starting a manual installation, i.e. get the services, install them, create whatever databases were needed, configure networking, etc.
However, came across an ISO install that OpenNebula recommends to use for lab purposes.
Fairly quickly I realized it could be use for a more production like setup.
Requirements
Not many people have several servers lying around so I am using EVE-NG.
You need:
- Three servers for the cluster controllers. They have 2 GB of memory. In a real production system 16 GB and at least 4 cores should be enough. Remember the controllers do not run any virtual machines or do networking, the hypervisors do.
- Two hypervisors nodes, In my case with 8 GB of memory, once again in production you should have at least three hypervisors with 512 GB of memory (1 TB in my opinion since in that case if you do maintenance on one you will still have enough processing power to have the cluster running on two nodes). And at least 16 cores, the more the better.
- A NFS server, cluster configuration will not work with local storage, you need shared storage. You can use NFS or an Equalogic or CEPH. My preference is CEPH. Here I alredy have a VM running NFS on EXSI, it was just a matter of connecting EVE-NG to it. If you are curious how to do it, it is fairly simple. EVE-NG has a recipe on their web site.
- The ISO file. Go to “Deploy OpenNebula On-prem with an ISO”, download the ISO.
- Create the virtual machines, of course you can use whatever app you want. For EVE-NG you need to create the ISO on a folder then create a qemu disk of least 40 GB. How to do this in EVE-NG is beyond the scope of this blog, once again EVE-NG has recipes.
- Every time you start a new machine it will install Alma Linux and configure the OS.
You need to pay attention on how you would segment your setup and how it wil access the Internet.
On a production system of course, you will have a management network, an external network, a cluster network and so on.
On EVE-NG you have to be a bit creative.
Your mangement network is also your Internet or external network.
So we will have the following:
- ens3 (e0 for EVE-NG) management, this allows us to upgrade the servers. It will eventually server as the network to have access to the Internet.
- ens4 (e1) The network to use for VXLAN tunnels. It needs an actual IP address otherwise VXLAN wolud not function.
- ens5 (e2) VX network for virtual machines not using VXLAN, this can eventually allow you to talk external switches via 802.1Q trunks for example.
- en6 (e3) NFS network to have images, instances etc.
- ens7 (e4) The actual cluster network that arbitrates, moves VMs around, creates networks, etc.
With above in mind the following is a logical (almost) diagram of the network.
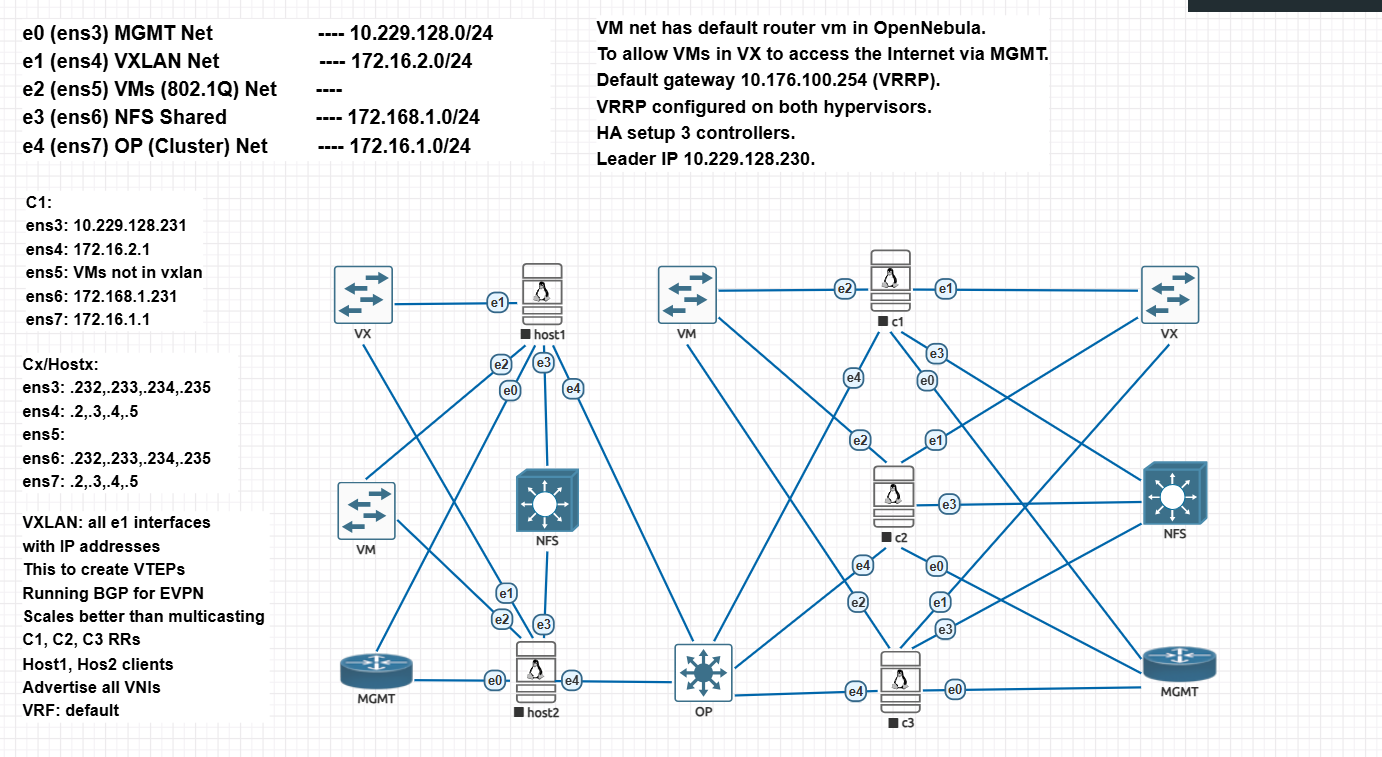
A few things to consider, the VM, VX and OP are dumb bridges the EVE-NG sets up for communication. In a real setup those will actually be connections to L2/L3 switches (preferably via trunks for higher throughput).
Installation
Now that we have everything in place, we can start.
Controller
We will install a single controller first.
Fire c1, you will be presented with a menu, choose “POC” and hit return.
After complaining that you should have more memory, disk space, blah, blah…., it will install the software needed to run as a controller.
Use root/0p3nN3bul4 as credentials. Log onto the console and create an additional user with sudo privileges, believe me I got bit by this and had to re-install. Change the root password.
Run “onefemenu”, this is a curses like window.
Follow the steps indicated on the OpenNebulas’ ISO web site.
For the first controller you want:
- ens3: 10.229.128.231/24 gw: 10.229.128.10 (this are my settings please use you own!)
- ens4: 172.16.2.1/24 (no GW)
- ens5: No IP address
- ens6: 172.168.1.231/24 (once again this is the network where my NFS is, use your own!)
- ens7: 172.16.1.1/24 (this is the network use for management access, I know it is confusing but the is OpenNebula management access not EVE-NG management access).
The app will run several ansible playbooks.
The network should look like below:
[root@onepoc ~]# ip add
1: lo: <LOOPBACK,UP,LOWER_UP> mtu 65536 qdisc noqueue state UNKNOWN group default qlen 1000
    link/loopback 00:00:00:00:00:00 brd 00:00:00:00:00:00
    inet 127.0.0.1/8 scope host lo
       valid_lft forever preferred_lft forever
    inet6 ::1/128 scope host
       valid_lft forever preferred_lft forever
2: ens3: <BROADCAST,MULTICAST,UP,LOWER_UP> mtu 1500 qdisc fq_codel state UP group default qlen 1000
    link/ether 00:50:01:00:01:00 brd ff:ff:ff:ff:ff:ff
    altname enp0s3
    inet 10.229.128.231/24 brd 10.229.128.255 scope global noprefixroute ens3
       valid_lft forever preferred_lft forever
    inet6 fe80::250:1ff:fe00:100/64 scope link noprefixroute
       valid_lft forever preferred_lft forever
3: ens4: <BROADCAST,MULTICAST,UP,LOWER_UP> mtu 1500 qdisc fq_codel state UP group default qlen 1000
    link/ether 00:50:01:00:01:01 brd ff:ff:ff:ff:ff:ff
    altname enp0s4
    inet 172.16.2.1/24 brd 172.16.2.255 scope global noprefixroute ens4
       valid_lft forever preferred_lft forever
    inet6 fe80::250:1ff:fe00:101/64 scope link noprefixroute
       valid_lft forever preferred_lft forever
4: ens5: <BROADCAST,MULTICAST,UP,LOWER_UP> mtu 1500 qdisc fq_codel state UP group default qlen 1000
    link/ether 00:50:01:00:01:02 brd ff:ff:ff:ff:ff:ff
    altname enp0s5
5: ens6: <BROADCAST,MULTICAST,UP,LOWER_UP> mtu 1500 qdisc fq_codel state UP group default qlen 1000
    link/ether 00:50:01:00:01:03 brd ff:ff:ff:ff:ff:ff
    altname enp0s6
    inet 172.168.1.231/24 brd 172.168.1.255 scope global noprefixroute ens6
       valid_lft forever preferred_lft forever
    inet6 fe80::250:1ff:fe00:103/64 scope link noprefixroute
       valid_lft forever preferred_lft forever
6: ens7: <BROADCAST,MULTICAST,UP,LOWER_UP> mtu 1500 qdisc fq_codel state UP group default qlen 1000
    link/ether 00:50:01:00:01:04 brd ff:ff:ff:ff:ff:ff
    altname enp0s7
    inet 172.16.1.1/24 brd 172.16.1.255 scope global noprefixroute ens7
       valid_lft forever preferred_lft forever
    inet6 fe80::250:1ff:fe00:104/64 scope link noprefixroute
       valid_lft forever preferred_lft forever
Next you will need to add hypervisors. It is worth noting that we will diverge from the standard installation. Normally you are using this for an all-in-one setup, in this fashion you add the controller you just configured as a host so it can run VMs.
We will not add the controller as a hypervisor, we will instead add the hypervisors as nodes that will be managed from the controller(s).
Hypervisors
Once again start one of the hosts. Choose add a node instead at the boot prompt.
Let it finished. Do access the console, the added node does not have the “onefemenu” app, instead run “onehostmenu”.
Configure the network, use the network diagram for guidance.
After it is done, go to the controller run “onefemenu”.
Choose add node, follow the prompts. You are adding the node you just created on the OP network( meaning use the OPenNebula management IP! ). Use root as the user, it will ask you for credentials. Let it finished.
Add the second hypervisor.
If everything run correctly you should be able to access horizon on c1 port 2626.
The credentials can be shown by running “onefemenu” and displaying them.
Before we continue though we need to do a couple of things on the hosts.
We would like to use the VM network for virtual machines but also a gateway so said machines can access external networks (i.e. the Internet).
Thus, we will add a bridge VM-1 which will have ens5 as a port.
VM-1 will use the following:
- IP address: 172.16.100.252/24 (host1, 172.16.100.253/24 (host2)
- Will run keepalived on both host1 and host2
- VRRP address: 172.16.100.254/24
This will be important later on, will add a virtual router that will allow VMs to use 172.16.100.254 to access external network (and the Internet using suitable masquerading rules).
We can of course use the “onehostmenu” app, however this is not recommended. If you have a custom BGP configuration which we will when we add nodes to the cluster, the BGP configuration gets overwritten.
We should run “nmtui”, this because we are running Alma linux and it uses NetorkManager.
However this being linux we do not have to that.
On each of the hypervisors cd to “/etc/NetworkManager/system-connections/”
Using nano, edit the ens5.nmconnection, it should look like this after editing:
[connection]
id=ens5
uuid=8bd0d7a7-540f-4f6d-a191-54d0031c8c6d
type=ethernet
controller=VM-1
interface-name=ens5
port-type=bridge

[ethernet]

[bridge-port]
Again use nano and create VM-1.nmconnection.
It should look like this after editing:
[connection]
id=VM-1
uuid=b468a409-b72a-445c-9890-99c4f8b003b6
type=bridge
interface-name=VM-1
timestamp=1784999502

[ethernet]

[bridge]

[ipv4]
address1=172.16.100.252/24
method=manual

[ipv6]
addr-gen-mode=default
method=auto

[proxy]
Restart the NetworkManager service. Install keepalived. configure it so keepalived.conf looks like this. Restart the service.
vrrp_instance VI_1 {
    state MASTER
    interface VM-1
    virtual_router_id 51
    priority 101
    advert_int 1

    unicast_src_ip 172.16.100.252
    unicast_peer {
        172.16.100.253
    }

    virtual_ipaddress {
        172.16.100.254/24
    }
}
After this look at the network it should look like this.
7: VM-1: <BROADCAST,MULTICAST,UP,LOWER_UP> mtu 1500 qdisc noqueue state UP group default qlen 1000
    link/ether 00:50:01:00:04:02 brd ff:ff:ff:ff:ff:ff
    inet 172.16.100.252/24 brd 172.16.100.255 scope global noprefixroute VM-1
       valid_lft forever preferred_lft forever
    inet 172.16.100.254/24 scope global secondary VM-1
       valid_lft forever preferred_lft forever
    inet6 fe80::5d53:9c29:99c1:7e98/64 scope link noprefixroute
       valid_lft forever preferred_lft forever
Do the same for host2. Make sure you have the correct IP addresses.
The network for host2 should like this:
7: VM-1: <BROADCAST,MULTICAST,UP,LOWER_UP> mtu 1500 qdisc noqueue state UP group default qlen 1000
    link/ether 00:50:01:00:05:02 brd ff:ff:ff:ff:ff:ff
    inet 172.16.100.253/24 brd 172.16.100.255 scope global noprefixroute VM-1
       valid_lft forever preferred_lft forever
    inet6 fe80::7cf:5ca7:f3dd:5ab0/64 scope link noprefixroute
       valid_lft forever preferred_lft forever
Finally enabled the rc.local service on both host1 and host2. There are plenty of recipes for this.
On bot hypervisors, save the /etc/frr/bgpd.conf to bgpd.conf.bak.
Add the following to rc.local:
cp /etc/frr/bgpd.conf.bak /etc/frr/bgpd.conf
systemctl restart frr
mount -a
systemctl restart frr
touch /var/lock/subsys/local
This will ensure that any custom configuration will be restored after a reboot. We will need a custom BGP configuration when we add the two controllers to the cluster.
Do not mind about the “mount -a” for the time being. This is to ensure that our NFS shares are correctly mounted. We will get to that later on.
Sunstone
Access the horizon ui at port 2626.
If you got to Hosts under Infrastructure, you should see the hosts.
As per our diagram, 172.16.1.4 and 172.16.1.5.
If you were to click on one of them you will see that they are hypervisors running KVM.
This not an issue on bare metal that has virtualization enabled. It is an issue on EVE-NG.
We need to re-add the hosts as QEMU.
This is very simple, just remove each host then re-add them and choose QUEMU. This will re-add both as QEMU hypervisors and allow you to run VMS.
Finally when you configure a VM template, for your CPU model choose qemu64.
You should have now two hypervisors being monitored and manage by the c1 controller.
BGP
Before we proceed to adding two more cluster members. We need to take a look at the BGP configuration installed.
The ISO will install FRR and a default BGP configuration. The config files will be under /etc/frr.
A typical bgpd.conf looks like this for the controller:
router bgp 64512
  bgp router-id 10.229.128.251
  bgp cluster-id 10.229.128.251
  no bgp default ipv4-unicast
  neighbor fabric peer-group
  neighbor fabric remote-as 64512
  neighbor fabric capability extended-nexthop
  neighbor fabric update-source 10.229.128.251
  bgp listen range 172.16.100.2/32 peer-group fabric
  address-family l2vpn evpn
    neighbor fabric activate
    neighbor fabric route-reflector-client
    advertise-all-vni
  exit-address-family
end
For the hypervisors:
router bgp 64512
  bgp router-id 10.229.128.252
  no bgp default ipv4-unicast
  neighbor fabric peer-group
  neighbor fabric remote-as 64512
  neighbor fabric capability extended-nexthop
  neighbor 10.229.128.251 peer-group fabric
  !
  address-family l2vpn evpn
    neighbor fabric activate
    advertise-all-vni
  exit-address-family
A couple of things to notice.
On the controller, we listen on /32 addresses (this belong to the hypervisors).
This will change when we go to a cluster, additionally we listen on the /24 OP network instead in addition to the EVE_NG management network. We will need to add the additional cluster members as route reflectors so BGP functions correctly, since if the VIP of the cluster moves that node should be able to exchange BGP information.
We make a copy of the final configuration and do make sure that configuration is the one loaded by FRR after a reboot.
If we were to add a third hypervisor, ansible will clover it. This ensures that at least the BGP fabric is working until we add the new hypervisor to it.
Now the next step is to add two more cluster nodes, configure a VIP and reconfigure BGP.
Cluster Nodes NFS and BGP setup.
We will add two cluster nodes to our setup. In addition will configure BGP since it is a custom setup.
Rather than waste paper, I will re-direct you to great resource again from OpneNebula.
OpenNebula Front End High Availability, this is a YouTube video showing exactly how to create a cluster for OpenNebula.
In our case, we will use 10.229.128.250 as the VIP of the cluster.
You should be able to connect to the VIP and run Sunstone.
Via cli you should see the following:
[root@onepoc ~]# onezone show 0
ZONE 0 INFORMATION
ID                : 0
NAME              : OpenNebula
STATE             : ENABLED


ZONE SERVERS
ID NAME            ENDPOINT
 0 10.229.128.231  http://10.229.128.231:2633/RPC2
 1 10.229.128.232  http://10.229.128.232:2633/RPC2
 2 10.229.128.233  http://10.229.128.233:2633/RPC2

HA & FEDERATION SYNC STATUS
ID NAME            STATE      TERM       INDEX      COMMIT     VOTE  FED_INDEX
 0 10.229.128.231  leader     244        16355      16355      0     -1
 1 10.229.128.232  follower   244        16355      16355      0     -1
 2 10.229.128.233  follower   244        16355      16355      -1    -1

ZONE TEMPLATE
ENDPOINT="http://localhost:2633/RPC2"
ENDPOINT_GRPC="localhost:2634"
You can see that the cluster zone 0, hast three members.
Member with ID 0 is the (10.229.128.231) is the leader. It you look at the network issuing “ip add”, you will see:
ens3: <BROADCAST,MULTICAST,UP,LOWER_UP> mtu 1500 qdisc fq_codel state UP group default qlen 1000
    link/ether 00:50:01:00:01:00 brd ff:ff:ff:ff:ff:ff
    altname enp0s3
    inet 10.229.128.231/24 brd 10.229.128.255 scope global noprefixroute ens3
       valid_lft forever preferred_lft forever
    inet 10.229.128.230/24 scope global secondary ens3
       valid_lft forever preferred_lft forever
    inet6 fe80::250:1ff:fe00:100/64 scope link noprefixroute
       valid_lft forever preferred_lft forever
Notice that in addition of having .231, it has IP .230 which is the VIP.
I recommend that you play with this by shutting a node, the cluster will move the VIP and you should be able to reach the cluster and manage it.
Interestingly enough, Sunstone does not give you the detail information you get by using the command line.
Now that you have a cluster you need to add NFS. Once again this step is well known so I will not go into much detail.
You need to install the NFS server packages on all member of the cluster and configure your fstab file so the shares are mount automatically.
Here I run into issues, using Ubuntu NFS shares get mount during boot.
With Alma linux this was not the case, spent a whole afternoon troubleshooting could not make it work, thus I added the “mount -a” on “rc.local” to make sure the shares are available.
If you got everything right you should see:
[root@onepoc ~]# onedatastore list
  ID NAME                                                             SIZE AVA CLUSTERS IMAGES TYPE DS      TM      STAT
 109 NFS-SYSTEM                                                      60.8G 61% 0             0 sys  -       shared  on
 108 NFS-IMAGE                                                       60.8G 61% 0             2 img  fs      shared  on
 107 NFS-FILE                                                        60.8G 61% 0             0 fil  fs      shared  on
   2 files                                                           14.6G 98% 0             0 fil  fs      local   on
   1 default                                                         14.6G 98% 0             2 img  fs      local   on
   0 system                                                              - -   0             0 sys  -       local   on
Now to something that is not well documented in my opinion.
As I already mentioned, the ISO runs ansible playbooks to automate the configuration.
This carries a problem, if you add two more controllers, or use the “onefemenu” to add an interface for example, ansible will clover you BGP configuration.
That is the reason we configure BGP directly after we have three nodes, we make sure the setup works then we copy it to a backup file and finally restore it as mentioned previusly on the rc.local files.
On each controller (which will act a route reflectors) edit the /etc/frr/bgpd.conf to contain:
[root@onepoc ~]# cat /etc/frr/bgpd.conf

!  Route Reflector configuration
!
hostname 10.229.128.231
!
log file /var/log/frr/bgpd.log informational
!
router bgp 64512
  bgp router-id 10.229.128.231
  bgp cluster-id 10.229.128.231
  no bgp default ipv4-unicast
  neighbor fabric peer-group
  neighbor fabric remote-as 64512
  neighbor fabric capability extended-nexthop
  neighbor fabric update-source 10.229.128.231
 # bgp listen range 172.16.1.5/32 peer-group fabric
 # bgp listen range 172.16.1.4/32 peer-group fabric
  bgp listen range 172.16.1.0/24 peer-group fabric
  bgp listen range 10.229.128.0/24 peer-group fabric
  address-family l2vpn evpn
    neighbor fabric activate
    neighbor fabric route-reflector-client
    advertise-all-vni
    advertise-svi-ip
  exit-address-family
end
For each controller, change the router-id, cluster-id, comment out the /32 commands and add the range stated.
You can look on the FRR web site about the syntax, briefly you are allowing the BGP process to listen on requests on certain networks and if so allow make BGP peering.
In addition it is very import that you advertise all vnis and all svis (allows you to see the VXLAN and MAC addresses that the hypervisors are advertising).
On each of the hypervisors, edit the same file and have it to it looks like this:
hostname 10.229.128.235
!
router bgp 64512
 bgp router-id 10.229.128.235
 no bgp default ipv4-unicast
 neighbor fabric peer-group
 neighbor fabric remote-as 64512
 neighbor fabric capability extended-nexthop
 neighbor 10.229.128.231 peer-group fabric
 neighbor 10.229.128.232 peer-group fabric
 neighbor 10.229.128.233 peer-group fabric
 !
 address-family l2vpn evpn
  neighbor fabric activate
  advertise-all-vni
  advertise-svi-ip
 exit-address-family
exit
Once gain change the IP addresses to much your setup.
Notice we are peering with the three controllers (not the VIP address).
After all of this using vtysh (the frr cli) you should see:
[root@onenode01 ~]#  vtysh

Hello, this is FRRouting (version 10.5.3).
Copyright 1996-2005 Kunihiro Ishiguro, et al.

onenode01# sh bgp summary

L2VPN EVPN Summary:
BGP router identifier 10.229.128.235, local AS number 64512 VRF default vrf-id 0
BGP table version 0
RIB entries 0, using 0 bytes of memory
Peers 3, using 71 KiB of memory
Peer groups 1, using 64 bytes of memory

Neighbor        V         AS   MsgRcvd   MsgSent   TblVer  InQ OutQ  Up/Down State/PfxRcd   PfxSnt Desc
10.229.128.231  4      64512       373       373        0    0    0 06:10:35            0        0 FRRouting/10.5.3
10.229.128.232  4      64512       374       374        0    0    0 05:07:00            0        0 FRRouting/10.5.3
10.229.128.233  4      64512       374       374        0    0    0 05:06:36            0        0 FRRouting/10.5.3
And on the controller:
[root@onepoc ~]# vtysh

Hello, this is FRRouting (version 10.5.3).
Copyright 1996-2005 Kunihiro Ishiguro, et al.

onepoc# sh bgp summary

L2VPN EVPN Summary:
BGP router identifier 10.229.128.231, local AS number 64512 VRF default vrf-id 0
BGP table version 0
RIB entries 0, using 0 bytes of memory
Peers 2, using 47 KiB of memory
Peer groups 1, using 64 bytes of memory

Neighbor        V         AS   MsgRcvd   MsgSent   TblVer  InQ OutQ  Up/Down State/PfxRcd   PfxSnt Desc
*10.229.128.234 4      64512       375       375        0    0    0 06:12:12            0        0 FRRouting/10.5.3
*10.229.128.235 4      64512       375       375        0    0    0 06:12:11            0        0 FRRouting/10.5.3

Total number of neighbors 2
* - dynamic neighbor
2 dynamic neighbor(s), limit 100
Of course since you are not running any VMs at this point you will not see any L2VPN EVPN routes advertised via VXLAN.
Access to External Networks
You now have a new shiny three node two hypervisor OPenNenula cluster.
Go crazy, download some images, create VMs, create VXLAN networks, etc.
So you have a VM, it can talk to other VMs in their own network however, you want it to be able to reach the Internet.
The default gateway for all VMs trying to access the Internet will be: 172.16.100.254, the VRRP ip!.
Add the following to rc.local on both hypervisors:
iptables -t nat -A POSTROUTING -s 172.16.100.0/24 ! -d 172.16.100.0/24 -o ens3 -j MASQUERADE
This will ensure that when you create a VM on either, when it tries to get to the Internet will hit the VRRP IP and do masquerading.
When you create a new VM, you need to remember to give it a gateway that needs to be known. This is easily done by creating a virtual router which its default gateway is the .254 and all other virtual networks connect to this virtual routers (the default GW for each virtual network) thus your VMs can reach the Internet.
Since this is also a router (virtual nonetheless), you can have rules to prevent inter VM communications. Remember the virtual router can be any linux appliance, the one OpenNebula uses is a minimal Alpine VM. I did create my own (Alpine also) and it works very well.
VMs, VXLAN and Testing
I will not go into how to create VMs, or a VXLAN network however, I want to show what EVPN BGP will show you.
Of course you need to create a few VMS and at least three networks.
First the virtual networks created:
[root@onepoc ~]# onevnet list
 ID USER     GROUP   NAME    CLUSTERS  BRIDGE  STATE LEASES OUTD ERRO
 3 oneadmin oneadmin VM-1       0      VM-1     rdy    2     0    0
 1 oneadmin oneadmin vxlan-600  0      vxlan600 rdy    2     0    0
 0 oneadmin oneadmin vxlan-500  0      vx500    rdy    2     0    0
I created three networks:
- A standard network for normal VMs
- Two VXLAN networks: vxlan600 and vxlan500
Then four virtual machines were created:
[root@onepoc ~]# onevm list
ID USER    GROUP    NAME       STAT CPU   MEM  HOST         TIME
6 oneadmin oneadmin VM-TEST1   poff 0.25  256M 172.16.1.5   17d 23h06
5 oneadmin oneadmin Router-1   runn 0.25  256M 172.16.1.4   17d 23h31
3 oneadmin oneadmin vxlan-600-1 poff 0.25 256M 172.16.1.4   18d 17h11
2 oneadmin oneadmin vxlan-500-1 poff 0.25 256M 172.16.1.5   18d 17h32
The VMs created are:
- VM-TEST1 (to access Router-1)
- Router-1 (the virtual router that allows access to the Internet)
- vxlan-600-1 (VMS on VXLAN NET600)
- vxlan-500-1 (VMS on VXLAN NET500)
If you SSH onto Router-1:
/home/miguel # cat /etc/os-release
NAME="Alpine Linux"
ID=alpine
VERSION_ID=3.21.7
PRETTY_NAME="Alpine Linux v3.21"
HOME_URL="https://alpinelinux.org/"
BUG_REPORT_URL="https://gitlab.alpinelinux.org/alpine/aports/-/issues"
1: lo: <LOOPBACK,UP,LOWER_UP> mtu 65536 qdisc noqueue state UNKNOWN qlen 1000
    link/loopback 00:00:00:00:00:00 brd 00:00:00:00:00:00
    inet 127.0.0.1/8 scope host lo
       valid_lft forever preferred_lft forever
    inet6 ::1/128 scope host
       valid_lft forever preferred_lft forever
2: eth0: <BROADCAST,MULTICAST,UP,LOWER_UP> mtu 1450 qdisc pfifo_fast state UP qlen 1000
    link/ether 02:00:ac:10:32:33 brd ff:ff:ff:ff:ff:ff
    inet 172.16.50.254/24 scope global eth0
       valid_lft forever preferred_lft forever
    inet6 fe80::acff:fe10:3233/64 scope link
       valid_lft forever preferred_lft forever
3: eth1: <BROADCAST,MULTICAST,UP,LOWER_UP> mtu 1450 qdisc pfifo_fast state UP qlen 1000
    link/ether 02:00:ac:10:33:33 brd ff:ff:ff:ff:ff:ff
    inet 172.16.51.254/24 scope global eth1
       valid_lft forever preferred_lft forever
    inet6 fe80::acff:fe10:3333/64 scope link
       valid_lft forever preferred_lft forever
4: eth2: <BROADCAST,MULTICAST,UP,LOWER_UP> mtu 1500 qdisc pfifo_fast state UP qlen 1000
    link/ether 02:00:ac:10:64:02 brd ff:ff:ff:ff:ff:ff
    inet 172.16.100.2/24 scope global eth2
       valid_lft forever preferred_lft forever
    inet6 fe80::acff:fe10:6402/64 scope link
       valid_lft forever preferred_lft forever
A few things to notice:
- The router is running alpine linux 3.21 with forwarding enable and IPTABLES installed
- eth2 allows access to the Internet. It has IP address 172.16.100.2 and the default GW is 172.16.100.254
- eth0 and eth1 are the ports that connect to the VXLAN VMs.
- Both have as ip addresses ending in .254, the default gateway for each VM. This is done when you create the VM or via a VM template among other things.
- This is as it was pointed out a VM. OpenNebula has now an appliance you can download. It is an Alpine Linux machine. So I decided to make my own.
If you start the other VLXLAN VMs, you should see BGP starting to advertise their mac addresses. This is importan because a VM on VXLAN-500 hypervisor 1 would not be able to talk to another VM on VXLAN-500 on hypervisor 2 unless VTEP and EVPN is working.
As an added bonus since we are using Router-1 VMs on different VXLANS will be able to communicate unless you add specific IPTABLES rules to deny access.
After starting th other VMS we can test connectivity.
On the Router:
PING 172.16.100.1 (172.16.100.1): 56 data bytes
64 bytes from 172.16.100.1: seq=8 ttl=64 time=2103.056 ms
64 bytes from 172.16.100.1: seq=9 ttl=64 time=1101.773 ms

/home/miguel # ping 8.8.8.8
PING 8.8.8.8 (8.8.8.8): 56 data bytes
64 bytes from 8.8.8.8: seq=0 ttl=114 time=40.752 ms
64 bytes from 8.8.8.8: seq=1 ttl=114 time=40.707 ms
The router can ping VM-1 at IP 172.16.100.1, the router can also ping the Internet.
Now let’s connect to one of the VMS. We will use VXLAN-500-1 becase it is on hypervisor 2, while the router runs on hypervisor 1. This will ensure the BGP EVPN is actually working.
From the router we SSH onto 172.16.50.50, I created a local user.
vxlan-500-1:~$ ip add
1: lo: <LOOPBACK,UP,LOWER_UP> mtu 65536 qdisc noqueue state UNKNOWN qlen 1000
    link/loopback 00:00:00:00:00:00 brd 00:00:00:00:00:00
    inet 127.0.0.1/8 scope host lo
       valid_lft forever preferred_lft forever
    inet6 ::1/128 scope host
       valid_lft forever preferred_lft forever
2: eth0: <BROADCAST,MULTICAST,UP,LOWER_UP> mtu 1450 qdisc pfifo_fast state UP qlen 1000
    link/ether 02:00:ac:10:32:32 brd ff:ff:ff:ff:ff:ff
    inet 172.16.50.50/24 scope global eth0
       valid_lft forever preferred_lft forever
    inet6 fe80::acff:fe10:3232/64 scope link
       valid_lft forever preferred_lft forever

vxlan-500-1:~$ ip route
default via 172.16.50.254 dev eth0  metric 1 onlink
169.254.16.9 dev eth0 scope link
172.16.50.0/24 dev eth0 scope link  src 172.16.50.50
We should be able to ping the Internet, and we know BGP is also working.
vxlan-500-1:~$ ping www.google.com
PING www.google.com (142.251.154.119): 56 data bytes
64 bytes from 142.251.154.119: seq=0 ttl=42 time=52.869 ms
64 bytes from 142.251.154.119: seq=1 ttl=42 time=54.530 ms
So let’s take a look at BGP EVPN. On the controller:
onepoc# sh bgp l2vpn evpn
BGP table version is 12, local router ID is 10.229.128.231
Status codes: s suppressed, d damped, h history, * valid, > best, i - internal
Origin codes: i - IGP, e - EGP, ? - incomplete
EVPN type-1 prefix: [1]:[EthTag]:[ESI]:[IPlen]:[VTEP-IP]:[Frag-id]
EVPN type-2 prefix: [2]:[EthTag]:[MAClen]:[MAC]:[IPlen]:[IP]
EVPN type-3 prefix: [3]:[EthTag]:[IPlen]:[OrigIP]
EVPN type-4 prefix: [4]:[ESI]:[IPlen]:[OrigIP]
EVPN type-5 prefix: [5]:[EthTag]:[IPlen]:[IP]

   Network          Next Hop            Metric LocPrf Weight Path
Route Distinguisher: 10.229.128.234:2
 *>i [2]:[0]:[48]:[02:00:ac:10:32:33]
                    10.229.128.234                100      0 i
                    RT:64512:500 ET:8
 *>i [2]:[0]:[48]:[46:ce:d0:b2:0b:fd]:[128]:[fe80::4e9:97ff:feef:66a4]
                    10.229.128.234                100      0 i
                    RT:64512:500 ET:8
 *>i [2]:[0]:[48]:[7a:b1:b9:46:44:93]:[128]:[fe80::4e9:97ff:feef:66a4]
                    10.229.128.234                100      0 i
                    RT:64512:500 ET:8
 *>i [3]:[0]:[32]:[10.229.128.234]
                    10.229.128.234                100      0 i
                    RT:64512:500 ET:8
Route Distinguisher: 10.229.128.234:3
 *>i [2]:[0]:[48]:[02:00:ac:10:33:32]
                    10.229.128.234                100      0 i
                    RT:64512:600 ET:8
 *>i [2]:[0]:[48]:[8e:41:5b:98:77:10]:[128]:[fe80::7802:84ff:fe45:d10]
                    10.229.128.234                100      0 i
                    RT:64512:600 ET:8
 *>i [3]:[0]:[32]:[10.229.128.234]
                    10.229.128.234                100      0 i
                    RT:64512:600 ET:8
Route Distinguisher: 10.229.128.235:2
 *>i [2]:[0]:[48]:[02:00:ac:10:32:32]
                    10.229.128.235                100      0 i
                    RT:64512:500 ET:8
 *>i [2]:[0]:[48]:[42:15:35:2c:98:e3]
                    10.229.128.235                100      0 i
                    RT:64512:500 ET:8
 *>i [2]:[0]:[48]:[42:af:f6:d1:11:98]:[128]:[fe80::e8e4:6aff:fee7:e526]
                    10.229.128.235                100      0 i
                    RT:64512:500 ET:8
 *>i [3]:[0]:[32]:[10.229.128.235]
                    10.229.128.235                100      0 i
                    RT:64512:500 ET:8
It works!. This is a lot to understand so I will not go into details.
Suffice to say that both hypervisors (10.229.128.234, and .235) are advertising VNIs and MAC addresses. The controller acts as a route reflector so each hypervisor knows where to find a machine MAC address and connect to it, VTEPs are working, VXLAN has created tunnels and L2VPN EVPN is advertising routes. Very cool.
We could ask ourselves what interface are the VTEPs using, you see .234 and .235 as the routes in BGP. These are not technically the actual VTEPs, when you create the VXLAN you tell OpenNebula what interface to use. We told it to use ens4. You can check this by issuing the following on each hypervisors:
[root@onenode00 ~]# ip link show type vxlan
11: ens4.500: <BROADCAST,MULTICAST,UP,LOWER_UP> mtu 1450 qdisc noqueue master vx500 state UNKNOWN mode DEFAULT group default qlen 1000
    link/ether 46:ce:d0:b2:0b:fd brd ff:ff:ff:ff:ff:ff
15: ens4.600: <BROADCAST,MULTICAST,UP,LOWER_UP> mtu 1450 qdisc noqueue master vxlan600 state UNKNOWN mode DEFAULT group default qlen 1000
    link/ether d2:a9:46:da:0c:64 brd ff:ff:ff:ff:ff:ff

[root@onenode01 ~]# ip link show type vxlan
14: ens4.500: <BROADCAST,MULTICAST,UP,LOWER_UP> mtu 1450 qdisc noqueue master vx500 state UNKNOWN mode DEFAULT group default qlen 1000
    link/ether 5a:02:f4:da:3b:68 brd ff:ff:ff:ff:ff:ff
As you can see, on both hypervisors the VTEPs are using ens4.vni, 500 and 600 respectively. I will let the reader ponder why we see the .234, .235 addresses rather than the ens4 IP addresses that actually create the tunnels.
Conclusions
This is it. You now have a working production OpenNebula cluster.
Some caveats:
- I tried using OVS for VXLANs. Run into issues, BGP would not advertise VNIs. I am trouble shooting this. The reason is that OVS is an abstract layer which is supposed to be OS agnostic. However, that is one of the problems at one point it needs to interact with the OS interfaces and kernel (the kernel space not the user space) to correctly send BGP packets from within OVS. This works of course but I myself have not figure it out yet. When I do I will post a solution.
- Using the kernel way for doing VXLANs is not an issue per say, OVS in my opinions is more elegant and scales better.
- Using the ISO is fantastic but since it uses ansible, if you want to change network parameters do not use “onefemenu” on the controller or “onehostmenu” on the hosts. Use “nmtui” or as we did configure the network directly.
- If you need to add another hypervisor, use the trick we stated, add the new host then immediately run the backup BGP configuration to avoid interruptions on all nodes. Then modify the BGP configuration of the new hypervisor.
- Perhaps this could be automated but I did not wanted to go into the rabbit hole and poke around the ansible scripts.
- Finally I did not create VRFs. This will be necessary for multi-tenancy on a production system. Your VNIs are already segmenting the network however you need to let the hosts known that they need to segment the kernel space. You will have to tweak your BGP configuration, create VRFs using FRR, map VLANs, and so on so far. Not difficult to do but you will need to test on a LAB setup until you feel confortable with it.
- Refer to the FRR documentation and also a good resource for this is PROXMOX since they do VRFs off the bat when you create VXLANs using their SDN implementation.
Well there you have it.
Ciao.