
Wanted to use Policy Response for a while, also called “DNS Firewall”. Created a lab to test the implementation and it is fairly straight forward.
Motivation
Let’s assume a couple of scenarios:
- You want to administer servers in the cloud, however you want to secure them as much as possible.
- You only allow connections from the Internet on the ports needed: HTTPS, DNS and perhaps another application
- For everything else you configure them to allow administration only via a VPN you have that connects from your network, home or enterprise.
- Of course you allow access via the local firewall for the VPN network.
- In addition you only allow Apache or NGINX connections to the Administration pages via VPN. This could include for example, phpMyAdmin, wp-admin, etc.
- You also allow SSH only via the VPN network.
- Of course you still have the tools that your cloud provider gives so you can always connect to your servers if you happen to shoot yourself on the foot!
- Or you have a developer network.
- You make changes and need to test.
- Testing needs to be done using the FQDN of your servers, if you have Apache for example.
- You could use hosts files, not a very scalable solution and would not work for virtual web servers.
A DNS firewall is suitable for this and other stuff as you will see.
DNS Firewall
From ISC, the creators of the “DNS Firewall” in Bind.
“A DNS firewall selectively intercepts DNS resolution for known-malicious network assets including domain names, IP addresses, and name servers. Interception can mean rewriting a DNS response to direct a web browser to a “walled garden,” or simply making the malicious network assets invisible and unreachable.”
As a security tool, it is a great asset. Since it can modify DNS responses, it can also be used to rewrite such responses to achieve a solution to the couple of scenarios we presented.
DNS Response Policy Zones (RPZ as it is also called), was invented at ISC. First implemented in Bind, however it is now an open and vendor-neutral standard for the interchange of DNS firewall configuration information.
DNS Server
The following shows a conceptual diagram of what we just discussed.
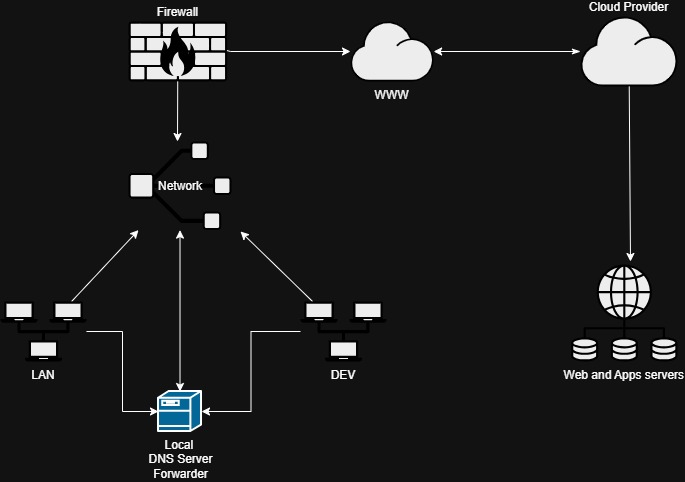
We need to create a DNS Bind server, unless you already have one in place.
I will show a basic configuration as it was done for the lab, we created the DNS server on the DEV network since it will be the one requesting modified records. You could create a MGMT network in addition for management, I am only showing DEV connecting to it.
Of course your clients need to point to this new DNS server, if you also have “normal” users that need to connect using unmodified records , you could just add this new server and make it a forwarder to your existing server.
Records that are not modified will not be affected.
DNS Setup
We will use the following parameters for our Bind configuration, adjust them for your setup.
- DNS_ZONE=”test.com”
- DNS_REVERSE=”192.168.1.in-addr.arpa”
- DNS_SERVER_IP=”192.168.1″
- DNS_SUBNET=”192.168.1.0/24:
- DNS_ADMIN_EMAIL=”admin.test.com”
- VPN_NETWORK=”10.64.1.0/24″
named.conf.options
Create file under “/etc/bin/named.conf”,
options {
    directory "/var/cache/bind";
    listen-on port 53 { 127.0.0.1; 192.168.1.1; };
    listen-on-v6 { none; };
    allow-query { 127.0.0.1; 192.168.1.0/24; };
    recursion yes;
    allow-recursion { 127.0.0.1; 192.168.1.0/24; };
    //"I have my own DNS server at 10.20.1.53"
    forwarders { 10.20.1.53; 8.8.8.8; };
    forward only;
    dnssec-validation auto;
    auth-nxdomain no;
    //"It forces Bind to use a response policy zone"
    response-policy { zone "response-policy"; };
};
named.conf.local
Edit the file “/etc/bin/named.conf.local” and insert the following:
zone "test.com" {
    type master;
    file "/etc/bind/db.test.com";
    allow-query { any; };
};

zone "192.168.1.in-addr.arpa" {
    type master;
    file "/etc/bind/db.192.168.1";
    allow-query { any; };
};

zone "response-policy" {
        type master;
        file "/etc/bind/db.response-policy";
        allow-query { none; };
};
Forward Zone
Now we need to create the forward zone. In the same directory create a file “db.test.com” and add the following.
$TTL    604800
@       IN      SOA     ns1.test.com. mail@miguelsarmiento.com. (
                              4         ; Serial
                         604800         ; Refresh
                          86400         ; Retry
                        2419200         ; Expire
                         604800 )       ; Negative Cache TTL
;
@       IN      NS      ns1.tes.com.
ns1     IN      A       192.168.1.1
web     IN      A       192.168.1.10
db      IN      A       192.168.1.11
mail    IN      A       192.168.1.12
client  IN      A       192.168.1.212
IP 192.168.1.1 is the DNS server, the other records are the ones you do not want to modify the responses.
Reverse Zone
Now create the revers zone db.192.168.1:
aa
$TTL    604800
@       IN      SOA     ns1.test.com. admin@test.com. (
                              4         ; Serial
                         604800
                          86400
                        2419200
                         604800 )
;
@       IN      NS      ns1.test.com.
1       IN      PTR     ns1.test.com.
10      IN      PTR     web.test.com.
11      IN      PTR     db.test.com.
12      IN      PTR     mail.test.com.
212     IN      PTR     client.test.com.
RPZ
Finally create the response policy zone “db.response-policy”:
$TTL 3600
@    IN      SOA     ns1.test.com. mail@test.com. (
        5       ; serial number YYMMDDNN
     3600       ; refresh 1 hour
     600        ; retry 10 minutes
     86400      ; expiry 1 week
     600 )      ; min ttl 10 minutes

@ IN NS test.com.
//"Sites that will have their DNS rewritten"
// Sites in the cloud managed via VPN
mysite1.mydomain.com A 10.64.0.10
mysite2.mydomain.com A 10.64.0.10
// Dev site for testing
mysite3.mydomain.com A 10.192.168.200
Test and Restart Bind
Test the configuration zones using the DNS tools.
Use named-chekconf and named-check-zone.
Use “named-checkconf -p” to print the parsed configuration.
Use “named-checkzone example.com /etc/bind/db.test.com” for example.
If there are no issues restart Bind and check if it is running, check the syslog to see if all zones were loaded.
If everything looks correct try doing a dig from a client on the correct network, it needs to have its DNS resolution pointing to the new server.
In my case I forgot to add the RPZ zone to the options configuration file, duh!
You should then see when you do a dig to “mysite1.mydomain.com “, you will see the new IP resolving and not the normal web address.
Conclussions
Congrats, you now have a DNS that can rewrite records, neat it is not?
Of course the initial intend of RPZ was to secure DNS records against malicious actors by rewriting responses and preventing access to questionable sites.
There you have it.
Ciao.